
 |
 |
 |

| |||
|
Figuring Out How Much Fringe to Buy
Attaching Fringe to Lampshades |
|
|
Figuring Out How Much Fringe to Buy
When trimming a lampshade, you need the measurement of the bottom wire, and the top wire, too, when doing both. If the shade is round, with a straight wire, you can multiply the diameter by 3.14 to get the circumference. With scalloped or otherwise shaped wire, measure one section, or sections, if they vary; then multiply this by how many times the sections are repeated. When adding fringe to anything else, (obviously,) you measure the edges that will be trimmed. Always buy, at least, a few more inches of fringe than you need. |
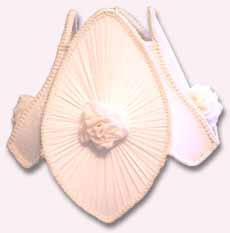
| When ordering fringe that has a repeated pattern, the width of the pattern, or repeat, is included in the description. Add 1/4" (6 mm) between repeats. How much you'll need may also depend on the shape of the frame. With some, such as this one, you might want the pattern to line up with certain points. To accomplish this, you'll have to work with sections of fringe, and perhaps not include the whole repeat at the high points. And with any frame, it's likely you'll have to do a little finagling to get the pattern to line up correctly where it joins. Knowing the width of the pattern, you should be able to calculate how much fringe it will take to do this, but, in any case, it's recommended that you get, at least, one extra repeat. |
|
|
TOP
Bead Fringe Tips If the fringe doesn't hang straight when first attached, chances are, it will after a day or two. A hair dryer may or may not help speed this up (and if the fringe is on plastic thread, can cause problems, so experiment, first). In some cases, it will be necessary to twist some of the beads a little to get them to line up right; however, it's the nature of some fringe to not hang perfectly straight. It may also help to lightly spritz the fringe with water (again, experiment, first). The strands are sewn to the binding with one continuous thread, which will come loose at cut ends, causing the loss of strands. A piece of tape will temporarily keep this from happening, or make it permanent by placing a tiny dab of white glue or clear nail polish, or taking a few stitches, over the last stitch or two before cutting, or immediately after removing the tape at a cut end. |
|
TOP
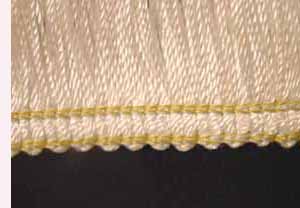
Rayon Fringe Tips Rayon fringe has a self-binding at the top and stitching at the bottom, as shown in this picture. As you can see, the strands are looped, and these loops must be cut off for the fringe to hang correctly and look the way it's supposed to. |
| This is always done as the very last step, after the fringe is attached and all trim applied. You want the cleanest cut possible, so use the sharpest scissors you have; and you may want to use this as a good excuse for having your scissors sharpened, or getting a new pair (even cheap sharp scissors are better than a dull pair). Cut right between the two rows of stitches, then remove the upper row. This is done a little differently when dyeing the fringe, further discussed below. |
|
|
TOP
|
| Dyeing Rayon Fringe | |
| Rayon accepts any fabric dye beautifully. Rit is easiest to find in the U.S., and what was used for the shades on this site (and by many other shadecrafters), but there are a variety of options to explore. You must always experiment first, and you'll need extra fringe for this purpose. Only an inch or two [2-5 cm] per test is required, but you'll likely end up doing multiple tests. |

|
|
Stitching note As discussed in Rayon Fringe Tips, above, don't remove the threads at the bottom until after the fringe is attached. Ignoring this rule, especially when dyeing, will likely lead to a tangled mess. However, because there will be lighter-colored lines where the thread is, instead of cutting between the two rows, cut just above the top row, making sure it's far enough to get rid of the slight kink in the strands that may have been created by the stitching (due to getting the fringe wet). If losing 3/8" (1 cm) is an issue, get the next longer length. This is also important to remember when doing the ombr� effect.
Dyeing Basics Use small batches of dye when experimenting, and make sure to write down the recipe of how much dye to water you used, and how long you soaked the fringe, at every step, so you can replicate what you did. And then attach a tag with the recipe number to your test pieces for future use. Keep in mind that the color of the fringe is darker when wet. When experimenting, use a hairdryer to speed up the drying time. The water only needs to be a few inches (several centimeters) deep, and if just dyeing the fringe one color, you can use any size pan it will fit into (although preferable if it can lay out flat, it's not mandatory). When creating a gradated or ombr� effect (a French word meaning "shade" or "shadow"), the wider the pan the better. An enamel turkey roaster works quite well (closely examine chips for rust, and remove any with Barkeeper's Friend [a finely powdered, rust-removing cleanser found at most grocery and hardware stores], or another rust remover). Heat the water until it's just simmering, not to a boil, then add your dye, stirring with something non-porous (a wooden spoon will absorb the dye, and then add it back into the next color dye bath). Use a 1/4 tsp. (1 ml) of powdered dye per 2 quarts (2 liters) of water (being very careful not to inhale any dye dust), and follow directions on the package for liquid. Soaking longer will produce a more intense color, and you should try this first, before adding (just a bit) more dye. You can move the pan to an easier surface to work on, but you'll need to heat the water back up if it cools down by much (cover to retain the heat). The hotter the water, the stronger the color. Use tongs to get the fringe out of the dye bath, or risk dropping it and causing a potentially permanent problem (if you don't have any, buy some). You'll also need something to lay the fringe in, or hold beneath it to catch the drips, when transporting it to the sink for rinsing. Wear an old shirt or something else you don't mind getting dye on. And make sure no powdered dye gets left behind on the surface where you're working—if even a speck of dry dye gets on your fringe, it will cause a darker spot. Rayon is much weaker when wet than when dry, so handle it with care. Dyeing all one color Fold the fringe (with the strands straight) as widely as the pan will allow, and get it thoroughly wet in hot (tap) water—uneven wetting results in uneven dyeing—then, submerge it in the dye bath. This fringe dyes fairly quickly, but how long it needs to soak should be determined when experimenting. If doing an ombr� effect and working with sections of fringe or trimming multiple shades (etc.) that must match, dye all the fringe before moving onto the next step. After dyeing, rinse the fringe well in warm, then cool water, until it runs clear, and lay it on an old bath towel (you don't mind staining). The fringe can still be folded, but straighten it out as best as you can, fold it within the towel, press out as much water as possible, then see the last paragraph. To create the ombr� effect After dyeing the fringe the first color, only squeeze out a bit of the excess water; you want it to still be wet. You also want it folded as widely as the pan will allow, so you can see as much of the fringe as possible. Inserting a few straight or safety pins will keep it folded. You can just hold it at the top edge (get a good grip on it, though, or it can be clipped to a hanger or rod. Anything made of wood should be sealed (with paint, polyurethane, or a solvent-based finish) to keep it from absorbing dye, and use plastic clothespins or metal bulldog clips for this same reason. A skirt hanger (with clips) also works quite well (coat the rubber on the clips with clear nail polish or other solvent-based finish). Dipping the fringe into the original dye bath will result in a subtle change of color. Leaving it in the dye longer may make it dark enough, or you may have to add a bit more dye, but, again, this is determined when experimenting. If using a different color, mix up the new dye bath, and make sure your fringe doesn't dry out, in the meantime (cover it with plastic wrap or put it in a plastic bag) and rewet it if it does. Keep in mind that dye is translucent, and the colors will combine to create other colors. For example: yellow dipped in red will likely turn out orange, or, at least, an orangey red. The dye will wick up the strands a bit, so dip the fringe to a little below where you want the color to change. And be sure to take into account when doing the darkest color that you'll be cutting 3/8" (1 cm) off the bottom. Rinse and squeeze out the excess water between each variation of color. Usually, the color gradates from the lightest at the top to darkest at the bottom, but, obviously, this can be reversed simply by dipping the top edge. If leaving some of the fringe undyed, get it completely wet, then dip it in the dye as far as desired.
When you're done dyeing After rinsing and removing as much water as you can, it's best to hang the fringe up to dry. It can be hung from a clothes line (better done inside, but if outside, avoid any direct sunlight), or folded and hung from a skirt hanger, or better yet, two or more skirt hangers hung some distance apart. Keep in mind that if the fringe hangs at an angle while drying, it will hang at that angle when attached. However, gravity takes care of this in a day or two. Lay towels or newspaper below the fringe to catch drips. If you don't like how it turns out, the fringe can be bleached back to white, but it's better to find this out when experimenting. To create a nice vintage or aged effect, or for various brown tones, rayon fringe can also be dyed with tea or coffee. And if you want it whiter than the creamy color it comes in, again, it can be bleached, just be sure to rinse it thoroughly afterwards (until you can no longer smell any trace of bleach).
Good Rayon and Other Fabric Dye and Dyeing Info
When it comes to fabric-covered lampshades, the ideal way to attach fringe is to sew it on. It's the most secure, allows for adjustments, and doesn't effect the binding (the strands are attached to), making it possible to remove the fringe and reuse it elsewhere. The alternatives are white glue, which allows some time for repositioning, or hot glue, which does not. Although quicker, neither are as permanent, and both leave glue residue on the binding, making reuse more problematic, if not impossible. It's always a good idea to pin the fringe in place, first, to see how it looks, and this is mandatory when working with patterned fringe, and some attachment methods. Ball-headed pins are easier to work with. The binding is always covered with trim, so be sure it's placed so it doesn't show when the trim is applied. And, in some cases, you may also find it easier to work with the fringe in shorter lengths, rather than one continuous piece. If sewing the fringe on Work with the shade on its side, so the fringe hangs down toward the center of the shade and out of your way. You can also do this with the shade on a heavy lamp base (held firmly in place with a finial; this won't work with clip-on shades); although you may find the sewing rather awkward. It may or may not be easier to use a curved needle when working with the shade on its side; it depends on the shape. However, you'll most likely find this is required when working with the shade on a lamp. Use polyester thread, no more than 15"-18" (28-45.7 cm) long, to reduce how often it gets tangled in the strands. Keep the fringe pinned in place, removing pins as you sew, and be prepared for the thread to also get caught on the pins. Removing as many pins as possible helps, as does paying close attention. Sew the fringe on using a whip stitch, and if not an experienced sewer keep in mind that it doesn't matter how neat your stitches are, since they'll be covered up with trim. Be careful to only stitch through the cover material, so your stitches don't show on the inside of the shade. Although doubled thread (both ends knotted together) is stronger, single thread is easier to remove for making adjustments. If you find it necessary to re-sew a section of fringe, using shorter lengths of thread makes this easier; otherwise, take some stitches at both ends of the section to keep the unremoved stitches in place. If using white glue Use a good-quality, quick-drying (tacky) crafter's or fabric glue, or Weldbond (found at hardware stores), which is stronger, and though takes longer to dry, gives you more open time for making adjustments. With this method, you may or may not find it easier to work with the shade on a heavy lamp base; it depends on the shade. And the fringe can be pinned in place, and the pins removed as you go, or not, depending on the fringe, and what's easiest for you. Just keep in mind that you don't have much time for making adjustments, so if not working with the shade on a lamp, put it on one right away before the glue has a chance to set up. If you mess up, the fringe can be washed to remove the glue, if done fairly quickly. Work in short sections, applying glue to the binding using a narrow, flat brush (or a wedge-shaped, make-up sponge cut into narrower pieces), so your fingers stay clean. You can use an accordion applicator and then spread the glue out, but avoid applying the glue directly from the bottle, which can burp and cause accidents. And hold the binding away from the shade, not directly over it, when applying the glue. In most cases, the fringe will have to be pinned in place while the glue sets, just be sure to remove the pins before it's completely dry, or this becomes much harder to accomplish (though not impossible). Tip It's a good idea to wax your pins with beeswax (available where sewing notions are sold and hardware stores), or a white candle, which takes just a second and helps prevent them from getting stuck (keep these pins in a separate container, so you only have to do this once). If using hot glue Work with the shade on a heavy lamp so you can immediately see if it's hanging correctly, since you won't have much, if any, time for making adjustments. Leave the fringe pinned in place, and remove the pins as you go, working in short sections. Apply a narrow bead of glue to the shade or binding, depending on the width of the binding, while being really careful not to get glue on the fringe or elsewhere on the shade. And if applying glue to the binding, once the first section is stuck on, stretch the next section taut, and take care not to burn yourself in the process. Attaching fringe to hardbacks The fringe can be attached with either white glue or hot glue. Work with the shade on a heavy lamp. This is done on top of the shade binding, and if bias tape, you may be able to test fit with pins; although if a heavier fringe, you run the risk of detaching the binding. Otherwise, use spring-style clothespins, which must be placed so the edge of the shade is as far up inside the jaws as it will go, with the spring touching the shade, to prevent denting (the first time you try this you'll see just what I mean). The clothespins will, obviously, effect the way the fringe hangs, so set them as far apart as possible.
Use a quick-drying, tacky white glue, and keep pressing on the (fringe) binding until the glue sets enough to move on. If using clothespins to hold the fringe in place after the glue is applied, it's best if they're plastic. If wooden, roll the narrow wick end of a new white candle inside the jaws to prevent them from getting stuck to the shade. Or use hot glue, which doesn't have this problem, though, again, doesn't have any open time for making adjustments, so be sure to place your fringe very carefully. For shades made of metal or plastic, see below.
Attaching fringe to solid objects If attaching fringe to wood, it's best to use either staples or upholstery tacks (little nails with a head on them), which can be removed so the fringe can be repositioned and reused. The second choice would be white glue, and if really quick drying, you may be able to keep pressing the binding in place until the glue sets, or temporarily tack it with push pins (that have been stuck into wax, first). The wood must also be sealed (with paint or finish), or it will absorb too much glue and the fringe will soon fall off. The other options are hot glue or strong, double-faced tape (cut to the width of the binding), and these are the only options when attaching fringe to metal, plastic, or anything non-porous. Unless stapling or tacking, it's usually a good idea to work with short sections of fringe. You then have to cover the binding with some sort of trim. On wood, it can be held in place with decorative upholstery tacks, which won't effect the binding; otherwise, use quick-drying white glue or hot glue. Attaching fringe to fabric Sewing is always best when attaching fringe to fabric, and this can be done by hand or machine. When machine stitching bead fringe, you'll need to set your presser foot over to the right to keep it from crushing the beads. It can be sewn to the backside, with a blind hem stitch, and the binding allowed to show, or covered with seam binding or ribbon. If your stitches show through, or the fringe is sewn to the outside, the stitches or binding must be covered with fabric, ribbon, or trim.
The binding can also be sandwiched between the fabric and a facing, or within a seam, but, again, adjust your presser foot when working with bead fringe. And always experiment first. The option is to glue the fringe on, either with a washable fabric glue, or Fabri-Tac or another dry-cleanable glue used to attach rhinestones and other embellishments. It may also be possible to use snaps (or snap tape) or Velcro to attach fringe to draperies, curtains, bed canopy, bed skirt, or a table cloth to make it removable for cleaning. On clothing, shawls, scarves (etc.) this will probably be too obvious, though maybe not. See Cleaning Fringed Fabrics for other considerations.
Hand washing fringed fabrics is the best idea, and then agitate as little as possible. If it's rayon fringe, roll the item in a towel to remove excess water. And with any fringe, it's better to hang it up while drying, or as soon as possible, and a light spritz of water may be required. Again, rayon fringe can be carefully combed with a wide-toothed comb, and there's a good chance it will need a bit of trimmimg. If it's something that has to be dry cleaned, and the fringe is sewn on, it's best to remove it. In my opinion, hand sewn stitches are easier to remove than machine stitches, but if attaching with the latter, use basting stitches (if this doesn't result in puckering). If the fringe is unremovable (or you'd rather not spend the time), make sure it's well attached (if glued on, it must be a dry-cleanable glue, and you should still take some basting stitches along the binding). To prevent tangling and stress the fringe should also be stabilized by sandwiching the strands within a folded (and creased) piece of tulle or other netting (light-weight and transparent), or thin white or muslin cotton fabric, held in place with basting stitches, about an inch (2.5 cm) or so from the attached edge, and 1/2"-3/4" (1.3-2 cm) from the loose edge, and down the middle, too, if you have the patience (use white polyester thread).
Be sure to leave enough of an overlap that you can tack the netting (etc.) to the fabric (at least) here and there. This is also a good idea when washing, but not as mandatory. Be sure to use a dry cleaner that's experienced in working with delicate garments, and chances are, you'll still be required to sign a waiver.
Disclaimer: Fabulous Fringe and The Gold-Kiser Co. aren't responsible for damage |
 |
 |
 |
